Let's Get Involved - Weathering JSA Wagons With James Makin
Welcome to another of our "Let's Get Involved" series of how-to modelling guides featuring techniques to take our models to another level. Today it is our lovely JSA steel wagons that is the subject, as James Makin captures the rather battered state the real wagons ended up in when in traffic in the eye-catching British Steel livery. Take it away, James!
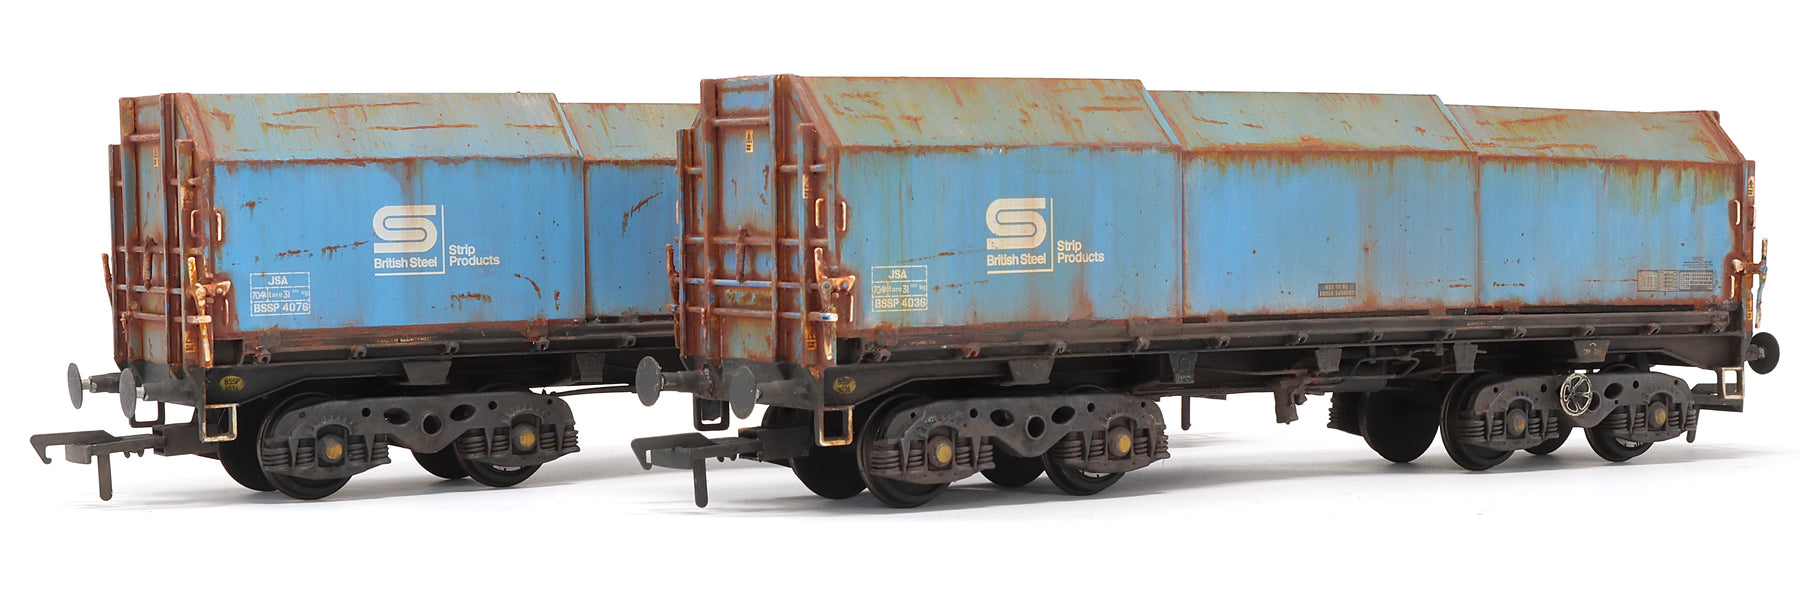
The British Steel ‘JSA’ wagons certainly stood out on the network when first introduced, their gorgeous bright-blue colour livery making them a striking sight. However, within a few short years, these wagons started fading and picking up a range of distinctive scrapes and damages, which really changed their appearance as time passed by.
This guide shows how you can transform your box-fresh Accurascale JSA wagons to the average condition of those found in the late 1990s and into the 2000s, using a range of simple weathering techniques explained in the step-by-step photographs below. It’s time to get stuck in!
Out of the box, you get two beautifully-finished wagons, ready to be worked on. The starting point for this weathering guide is to first spray on a coat of Railmatch Matt Varnish (No. 1407) – available in easy aerosol format, this enamel-based varnish is sprayed all over every surface of each wagon, and really helps to give a good ‘key’ for the weathering paint layers to stick to the wagon. It’s important to allow good time for this varnish layer to fully dry and harden before proceeding further, so it’s recommended to leave the wagons for at least 30 days before starting the next stage.

One of the first things that can be noticed about these wagons is the bright British Steel blue soon faded to a lighter shade. In model form, this can be recreated by painting on a layer of white paint, and then quickly wiping this away afterwards. The pigment in the white paint will stain the layer of matt varnish applied, leaving a slightly whitened finish.
Start by applying neat Humbrol 34 Matt White paint to a small section of the blue wagon body, and then carefully wipe away using a kitchen towel or cotton buds. Try to work methodically in straight vertical lines downward on the sides where possible, and use cotton buds to tease out any excess paint in the hard-to-reach areas.

This shows the overall effect desired after some careful work to apply and then wipe away the layer of white paint. A top tip here is to only work on a small section of the wagon at a time to avoid the white paint drying out on the wagon. If the paint does start to dry or become sticky before being removed, simply apply more fresh wet paint over the top, and then try wiping away again.
White paint will get stuck in the recesses between panel gaps and at the ends, however this is not a problem as it will be covered up by subsequent layers of weathering. Allow 2-3 days paint drying & hardening time after applying the white paint before tackling the next stage.

With the faded white layer fully hardened, it was now time to follow the same method again, but with dirt & rust-coloured shades, working from light to dark. Three shades would be applied and removed in sequence, starting with Humbrol No. 62 Matt Leather (light brown), No. 186 mid-brown, Humbrol and finally No. 113 dark-brown.
Here we can see the first shade of light brown being applied, again just using neat Humbrol paint, straight from the tin and liberally painted across the blue wagon cover. This is then wiped away using a kitchen towel to remove the bulk of the wet paint, leaving a brown hue to the blue paintwork.
With the bulk of the light-brown paint removed from the wagon, it’s time to take even more away, this time using a cotton bud, dipped in Humbrol enamel thinners. This allows you to take almost all of the brown away, except leaving the residue in the hard-to-reach areas, and covering all traces of the previous layer of white paint.
Rub the cotton bud across the wagon, working in a vertical motion from top to bottom, mimicking the effect of rainwater driving the dirt and rust streaks down the side of the wagon. If you have any rusty streaks on your prototype wagons, you can recreate this by leaving bits of brown behind on the blue wagon body. Again, allow 2-3 days paint drying & hardening time before proceeding to the next stage.

The roof of the hoods weathers slightly differently to the sides. Here, we can see the next shade of mid-brown (Humbrol No. 186) being applied all across the wagon, starting with the roof first.

Once applied to the roof, the wet brown paint is dabbed with a kitchen towel to remove a significant amount, but also being careful to leave a heavy stain on the roof, where a lot of dirt and general grime gathered and clung to the spot. The angled sides to the blue hood also received a heavier weathering than the vertical sides, so whilst working with the kitchen towel, the neat mid-brown paint is wiped away to reflect this.
It’s a complex area of weathering, so it’s recommended to consult pictures of prototype JSA steel wagons, there’s a great photograph included within the box from Accurascale, and alongside this, more can be found on Flickr, Smugmug or searches in Google Images.

With the mid-brown paint layer applied and left to dry, the final coating of dark brown (Humbrol 113) was then applied, in the same paint-on and wipe-off technique as before. The reason behind using a trio of browns is to help add a depth to the weathering with multiple shades of brown showing through each other.

The kitchen towel makes light work of removing the dark-brown layer of weathering from the vertical sides of the hood. The process is a straightforward one to follow, care must be taken at all times to avoid snagging the kitchen towel on some of the raised detail parts such as the intricate levers and door handles on the ends of the wagon, however any loose parts can be reattached later on.

Finally the enamel thinners is brought out once more to help remove the last traces of the paint from where it is not required. The streaking can be gently refined by working with the cotton bud and a smidgen of enamel thinners, gently removing the excess dirt either side of the ‘streak’ that you are hoping to create.

It’s now time to replicate some of the prominent scrapes and damages to the blue hoods – battle scars from a hard life on the network! A wide palette of browns & greys are used to build up each scar, working from light to dark, with the darkest shade being used very sparingly for the epicentre of any rust patches. The Humbrol enamels displayed are used in order from left to right, starting with No. 62, followed by No’s 186, 113, 133, 251 and finally, No. 32.

The scars are painted onto the wagon in the respective places, following prototype photographs for guidance as much as possible. On the roof and angled sides of the blue wagon hood, there are several distinctive scrapes that can be seen running along the wagon. These are first picked out with the very light brown paint using a fine 5/0 paintbrush. Darker shades of brown are then added on top, with decreasing amounts each time, working towards the epicentre of the rust outbreak. As well as the palette of browns, other shades can be added at this time, to match any other damages and marks on the wagon too.

Having finished work on the body of the wagon, the underframe then received attention. The black solebar, chassis and bogies are all painted in a mix of browns and greys, mottled on, and following prototype pictures to see which areas are more tinged with lighter brown brake dust deposits, and darker browns to represent areas where oily patches are commonly observed. Phoenix Paint’s ‘Track Dirt’ ‘Oil Leakings’ and ‘Brake Dust’ are used here, however any similar shades will work perfectly well, the key is to find and follow prototype pictures during the painting. 
Moving onto the wheelsets, Craig etched stainless steel brake disc inserts were added to one wheel of each axle, fixed in place with strong PVA glue, and left to dry.

With the PVA glue dry, each wheel could now be painted and weathered. Dark brown & dark grey paint is applied over the face of the etched brake disc, and wiped away, which helps to slightly lessen the bright finish and leave more dirt in the recesses on the etch. The rest of the wheel and axle is also painted in the same dark brown and dark grey colour.

Once the paint is dried, the axles are ready to be added back into the wagon. The image shows that just the simple act of painting and weathering the bright wheels, it can make such a difference, and is a key weathering piece on any rolling stock project.

On the prototype, the buffer heads often have a layer of thick, dirty grease, and this is replicated in model form by dipping a cotton bud in dark grey paint, and dabbing onto the centre of each buffer head. As a final touch, the buffer shank is picked out in silver to reflect the polished shiny metal where it is compressed into the wagon when coupled up.

The wagons are now ready for a final coat of Railmatch Matt Varnish, to give a pleasing all over-matt finish, as well as protecting the weathering against any handling.

A final touch that you can add after the varnish layer is a small amount of Humbrol Metalcote Gun Metal (No. 27004) – a specialist paint that dries with a matt finish, but will shine if rubbed over with a cotton bud. This can be ideal to highlight raised detail on dark surfaces such as the bogies. A small amount of the paint was drybrushed over the tops of the bogies on each model.

With the gunmetal paint dry, a cotton bud was lightly rubbed over where it has been applied, and sure enough, the raised parts of the surface starts to shine and highlight some of the chassis detail.
Summary


These gorgeous bright blue wagons may at first seem too pretty to weather, but hopefully this feature shows what can be done through the use of several straightforward weathering techniques to bring out the best in the models and make them feel right at home on a typical late 1990s steel working!
Many thanks James! Our JSAs of all types are currently sold out direct, but check out our retail network as they may still have some left in stock. Would you like to see another run of our epic steel wagons? Let us know!